Just downloaded 5Nine Hyper-v Manager 3.7 Free version and this is what I found.
NEW******************NEW*********************NEW*****************NEW
Just released a new hyper-v manager that is free for non commercial use and pay for use if commercial.
I endorse this product as I helped in it's design and features and the GUI is much better than my product.
http://www.probus-it.se/hypervtools/hypervmanager
Probus-IT Hyper-V Manager (HVM) will help you to manage Hyper-V Servers and virtual machines. It is especially useful on core installations where you cannot run Microsoft Hyper-V manager locally. No RSAT or DOT-Net install needed. No fiddling with cmdkey and HVRemote-scripts. Installs on 32 and 64-Bit windows. Use it on Servers, desktops and Core installations both 32 and 64-Bit.
Thanks Håkan Lindén
NEW******************NEW*********************NEW*****************NEW
Getting closer but still not there.
Creating a new vSwitch it cuts off the name (to be fair Microsoft does the same thing)
Creating a a new VM the product allows you to choose a path\folder but will not allow you to create the folder? I tried right-clicking everywhere to get a create or new folder popup and found none.
Creating a new VM it creates a new VHDX file but does not let you choose the type of drive you want. You get a dynamic drive. If you want a Fixed VHDX drive you need to skip this step and then when the VM is created you can go back into settings and then create a new VHDX file and choose Fixed and then attach it to the VM. Works but seems the long way around.
Also as a matter of preference I like to be able to set the NUMLOCK enabled when I build the VM and also be able to choose the number of vCPU's as well. Having to build the the VM and them go back into settings and set it up the way I really wanted seems like a waste of time and added steps.
I also miss the NOTES field so I can add a note if the VM name is not enough to describe what it does or its functions or installed features.
So getting better but still not there. Cannot wait to see what the next version brings.
Tips, Tricks and Workarounds for the new free Microsoft core server 2012 or hyper-v 3.0 standalone server.
Monday, September 30, 2013
Monday, September 23, 2013
Small issue in PSHVM30 VHOST manager TAB....
Thanks to a diligent user it was discovered that the Virtual Machine Path and Virtual Hard Disk Path were reversed.
This has now been fixed.....
It can be fixed several ways
You can edit your Hyperv.ps1 file with notepad and fix it by making sure stuff that is highlighted is changed as it is is shown below.
#~~< VHOSTmgr Input button 1 >~~~~~~~~~~~~~~~~~~~~~~~~~~~~~~~~~~~~~~~~~~~~~~~~~~~~~~~~
$VHOSTmgrTextbox1 = New-Object System.Windows.Forms.TextBox
$VHOSTmgrTextbox1.Location = New-Object System.Drawing.Size(10,275)
$VHOSTmgrTextbox1.Size = New-Object System.Drawing.Size(200,170)
$frmVHOSTmgr.Controls.Add($VHOSTmgrTextbox1)
$BrowseButtonVMGR1 = New-Object System.Windows.Forms.Button
$BrowseButtonVMGR1.FlatStyle = [System.Windows.Forms.FlatStyle]::System
$BrowseButtonVMGR1.Location = New-Object System.Drawing.Size(220,275)
$BrowseButtonVMGR1.Size = New-Object System.Drawing.Size(250,23)
$BrowseButtonVMGR1.Text = "Browse to Virtual Hard Disk Path..."
$BrowseButtonVMGR1.Add_Click({
$VMPATH = $Browser.SelectFolder("Choose your Virtual Machine Path - Cancel = No change", "C:\", [IntPtr]::Zero)
If($VMPATH) {
[system.windows.forms.messagebox]::show($VMPATH)
$VHOSTmgrTextbox1.Text = $VMPATH}
})
$frmVHOSTmgr.Controls.Add($BrowseButtonVMGR1)
#~~< VHOSTmgr Input button 2 >~~~~~~~~~~~~~~~~~~~~~~~~~~~~~~~~~~~~~~~~~~~~~~~~~~~~~~~~
$VHOSTmgrTextbox2 = New-Object System.Windows.Forms.TextBox
$VHOSTmgrTextbox2.Location = New-Object System.Drawing.Size(10,305)
$VHOSTmgrTextbox2.Size = New-Object System.Drawing.Size(200,170)
$frmVHOSTmgr.Controls.Add($VHOSTmgrTextbox2)
$BrowseButtonVMGR2 = New-Object System.Windows.Forms.Button
$BrowseButtonVMGR2.FlatStyle = [System.Windows.Forms.FlatStyle]::System
$BrowseButtonVMGR2.Location = New-Object System.Drawing.Size(220,305)
$BrowseButtonVMGR2.Size = New-Object System.Drawing.Size(250,23)
$BrowseButtonVMGR2.Text = "Browse to Virtual Machine Path..."
$BrowseButtonVMGR2.Add_Click({
$VHDPATH = $Browser.SelectFolder("Choose your Virtual HardDisk Path- Cancel = No change", "C:\", [IntPtr]::Zero)
If($VHDPATH) {
[system.windows.forms.messagebox]::show($VHDPATH)
$VHOSTmgrTextbox2.Text = $VHDPATH}
})
You can download an already fixed Hyperv.ps1 file from
https://skydrive.live.com/?cid=f8e137f6fd1c75f2&id=F8E137F6FD1C75F2%21105&Bsrc=Share&Bpub=SDX.SkyDrive&sc=Documents#cid=F8E137F6FD1C75F2&id=F8E137F6FD1C75F2%21213&sc=Documents and then simply copy and over write your old hyperv.ps1
Or you can completely download the app (not recommended if you have made any customizations)
pshvm.codeplex.com and start over.
This has now been fixed.....
It can be fixed several ways
You can edit your Hyperv.ps1 file with notepad and fix it by making sure stuff that is highlighted is changed as it is is shown below.
#~~< VHOSTmgr Input button 1 >~~~~~~~~~~~~~~~~~~~~~~~~~~~~~~~~~~~~~~~~~~~~~~~~~~~~~~~~
$VHOSTmgrTextbox1 = New-Object System.Windows.Forms.TextBox
$VHOSTmgrTextbox1.Location = New-Object System.Drawing.Size(10,275)
$VHOSTmgrTextbox1.Size = New-Object System.Drawing.Size(200,170)
$frmVHOSTmgr.Controls.Add($VHOSTmgrTextbox1)
$BrowseButtonVMGR1 = New-Object System.Windows.Forms.Button
$BrowseButtonVMGR1.FlatStyle = [System.Windows.Forms.FlatStyle]::System
$BrowseButtonVMGR1.Location = New-Object System.Drawing.Size(220,275)
$BrowseButtonVMGR1.Size = New-Object System.Drawing.Size(250,23)
$BrowseButtonVMGR1.Text = "Browse to Virtual Hard Disk Path..."
$BrowseButtonVMGR1.Add_Click({
$VMPATH = $Browser.SelectFolder("Choose your Virtual Machine Path - Cancel = No change", "C:\", [IntPtr]::Zero)
If($VMPATH) {
[system.windows.forms.messagebox]::show($VMPATH)
$VHOSTmgrTextbox1.Text = $VMPATH}
})
$frmVHOSTmgr.Controls.Add($BrowseButtonVMGR1)
#~~< VHOSTmgr Input button 2 >~~~~~~~~~~~~~~~~~~~~~~~~~~~~~~~~~~~~~~~~~~~~~~~~~~~~~~~~
$VHOSTmgrTextbox2 = New-Object System.Windows.Forms.TextBox
$VHOSTmgrTextbox2.Location = New-Object System.Drawing.Size(10,305)
$VHOSTmgrTextbox2.Size = New-Object System.Drawing.Size(200,170)
$frmVHOSTmgr.Controls.Add($VHOSTmgrTextbox2)
$BrowseButtonVMGR2 = New-Object System.Windows.Forms.Button
$BrowseButtonVMGR2.FlatStyle = [System.Windows.Forms.FlatStyle]::System
$BrowseButtonVMGR2.Location = New-Object System.Drawing.Size(220,305)
$BrowseButtonVMGR2.Size = New-Object System.Drawing.Size(250,23)
$BrowseButtonVMGR2.Text = "Browse to Virtual Machine Path..."
$BrowseButtonVMGR2.Add_Click({
$VHDPATH = $Browser.SelectFolder("Choose your Virtual HardDisk Path- Cancel = No change", "C:\", [IntPtr]::Zero)
If($VHDPATH) {
[system.windows.forms.messagebox]::show($VHDPATH)
$VHOSTmgrTextbox2.Text = $VHDPATH}
})
You can download an already fixed Hyperv.ps1 file from
https://skydrive.live.com/?cid=f8e137f6fd1c75f2&id=F8E137F6FD1C75F2%21105&Bsrc=Share&Bpub=SDX.SkyDrive&sc=Documents#cid=F8E137F6FD1C75F2&id=F8E137F6FD1C75F2%21213&sc=Documents and then simply copy and over write your old hyperv.ps1
Or you can completely download the app (not recommended if you have made any customizations)
pshvm.codeplex.com and start over.
Thursday, August 15, 2013
PSHVM30 - RELEASED Download it now and see what GUI fun you can have
I want to thank Adam Driscoll (without whom none of this would ever had happened), the BETA testers and the corefig team for the use of some code and ideas. Last but not least Eric Siron for switches and teams and his roll in corefig 1.1.
Free to all, open source hyper-v manager
Download the standalone version of PSHVM
Download PSHVM30 Intergrated with Corefig 1.1
NEW******************NEW*********************NEW*****************NEW
Just released a new hyper-v manager that is free for non commercial use and pay for use if commercial.
I endorse this product as I helped in it's design and features and the GUI is much better than my product.
http://www.probus-it.se/hypervtools/hypervmanager
Probus-IT Hyper-V Manager (HVM) will help you to manage Hyper-V Servers and virtual machines. It is especially useful on core installations where you cannot run Microsoft Hyper-V manager locally. No RSAT or DOT-Net install needed. No fiddling with cmdkey and HVRemote-scripts. Installs on 32 and 64-Bit windows. Use it on Servers, desktops and Core installations both 32 and 64-Bit.
Thanks Håkan Lindén
NEW******************NEW*********************NEW*****************NEW
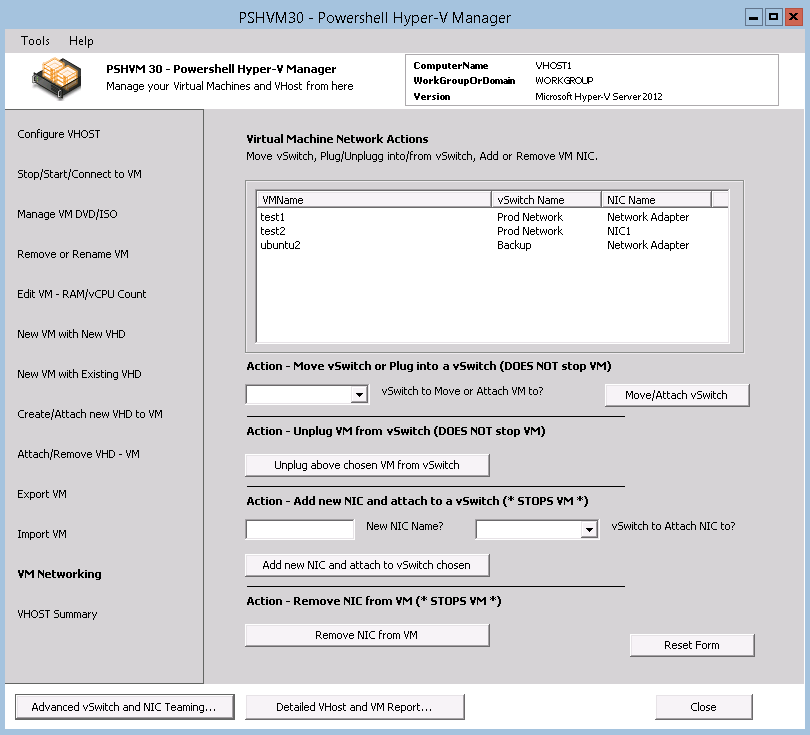
Here is the preview of the all GUI new PSHVM30 photos are not in order but you get the idea.
Features:
Free to all, open source hyper-v manager
Download the standalone version of PSHVM
Download PSHVM30 Intergrated with Corefig 1.1
NEW******************NEW*********************NEW*****************NEW
Just released a new hyper-v manager that is free for non commercial use and pay for use if commercial.
I endorse this product as I helped in it's design and features and the GUI is much better than my product.
http://www.probus-it.se/hypervtools/hypervmanager
Probus-IT Hyper-V Manager (HVM) will help you to manage Hyper-V Servers and virtual machines. It is especially useful on core installations where you cannot run Microsoft Hyper-V manager locally. No RSAT or DOT-Net install needed. No fiddling with cmdkey and HVRemote-scripts. Installs on 32 and 64-Bit windows. Use it on Servers, desktops and Core installations both 32 and 64-Bit.
Thanks Håkan Lindén
NEW******************NEW*********************NEW*****************NEW
Here is the preview of the all GUI new PSHVM30 photos are not in order but you get the idea.
Features:
- Set the Virtual Machine and HardDisk paths for the VHost
- Create/Remove a vSwitch
- Advanced NIC and vSwitch features like NIC Teaming*
- Create a new vm via questions and answers
- Start/Stop a VM
- RDP to a VM (replaces vmconnect and mstsc) (1)
- Manage VM's DVD/ISO.. Eject/Insert/Insert MS tools
- Remove/Delete a VM
- Export a VM
- Import a VM
- Edit the VM's Name, RAM Amount, vCPU Count, NIC's, Networks/vSwitch(s) and Virtual Disks
- Gather an Inventory Report of the VHost and VM's
Thursday, July 25, 2013
Getting your VM name and OS Name with powershell
this is now part of the reporting.codeplex.com open source code project.. free to anyone.
Here is a function that will return the VMName and OSName of all the vm's running on your VHOST. Be aware it will not return and OSNAME if the VM is not powered on.
function Get-VMOSName
{
param($VMName)
$kec = get-ciminstance -ClassName msvm_computersystem -namespace root\virtualization\v2 | where elementname -eq $VMName | Get-CimAssociatedInstance -ResultClassName MSVM_KvpExchangeComponent -Namespace root\virtualization\v2
$xml = [xml]"$($kec.GuestIntrinsicExchangeItems) "
$nav = $xml.CreateNavigator().SelectSingleNode("root/INSTANCE/PROPERTY[@NAME='Name']/VALUE[child::text() = 'OSName']")
if ($nav -ne $null)
{
$nav.MoveToParent() | Out-Null
$nav.SelectSingleNode("PROPERTY[@NAME='Data']/VALUE/child::text()").Value
}
}
#to return the OSNAME for a single VM
#get-VMOSName test1
# to return a table of the VMName and OSName of all VM's
#Note will not return an OSName is a VM is powered off.
Get-VM | Add-Member -Name "OSName" –MemberType ScriptProperty –Value {
Get-VMOSName $this.Name
} -PassThru -Force | Select Name,OSName | format-table -autosize
Here is a function that will return the VMName and OSName of all the vm's running on your VHOST. Be aware it will not return and OSNAME if the VM is not powered on.
function Get-VMOSName
{
param($VMName)
$kec = get-ciminstance -ClassName msvm_computersystem -namespace root\virtualization\v2 | where elementname -eq $VMName | Get-CimAssociatedInstance -ResultClassName MSVM_KvpExchangeComponent -Namespace root\virtualization\v2
$xml = [xml]"
$nav = $xml.CreateNavigator().SelectSingleNode("root/INSTANCE/PROPERTY[@NAME='Name']/VALUE[child::text() = 'OSName']")
if ($nav -ne $null)
{
$nav.MoveToParent() | Out-Null
$nav.SelectSingleNode("PROPERTY[@NAME='Data']/VALUE/child::text()").Value
}
}
#to return the OSNAME for a single VM
#get-VMOSName test1
# to return a table of the VMName and OSName of all VM's
#Note will not return an OSName is a VM is powered off.
Get-VM | Add-Member -Name "OSName" –MemberType ScriptProperty –Value {
Get-VMOSName $this.Name
} -PassThru -Force | Select Name,OSName | format-table -autosize
Tuesday, July 9, 2013
How to use the Recycle Bin (Empty/Restore) on Free Core Server 2012
This has now been added to pshvm.codeplex.com a free powershell hyper-v manager project.
UPDATE: it has been brought to my attention by Vincent Loosveld that if you are using the freeware app A43 as the file manager and shortcuts launcher as I have created it in PSHVM then you can easily GUI access the recycle bin see pic below.
But if you want to do it with powershell here is how:
Here is the code: File named get-recycled.ps1
<#
.Deleting items more than 10 days old
Get-Recycled | ?{$_.Age.TotalDays -gt 10} | Remove-Item
#Get original location of all items deleted in the last hour
Get-Recycled | ?{$_.Age.TotalHours -le 1} | %{$_.OriginalFullName}
.Restore all zip files without overwriting newer files with the same names.
Get-Recycled | ?{$_.Extension -eq ".zip"} | %{Move-Item $_ $_.OriginalFullName}
.Restore all zip files, overwriting newer files if necessary.
Get-Recycled | ?{$_.Extension -eq ".zip"} | %{Move-Item $_ $_.OriginalFullName -Force}
#>
function get-recycled
{
$sa = New-Object -ComObject Shell.Application
$DisplaceDateId = '{9B174B33-40FF-11D2-A27E-00C04FC30871}3'
$DisplaceFromId = '{9B174B33-40FF-11D2-A27E-00C04FC30871}2'
$sa.Namespace(10).Items() | %{
$item = Get-Item -LiteralPath $_.path;
$OriginalName = $_.Name
$whenUtc = $_.ExtendedProperty($DisplaceDateId);
$whenLocal = $whenUtc.ToLocalTime();
$OriginalParent = [IO.DirectoryInfo]($_.ExtendedProperty(
$DisplaceFromId))
$OriginalFullName = Join-Path $OriginalParent $OriginalName
Add-Member -MemberType NoteProperty -Name DeletionTimeUtc `
-Value ($whenUtc) -InputObject $item;
Add-Member -MemberType NoteProperty -Name DeletionTime `
-Value ($whenLocal) -InputObject $item;
Add-Member -MemberType ScriptProperty -Name Age `
-Value {(Get-Date) - $this.DeletionTime} `
-InputObject $item;
Add-Member -MemberType NoteProperty -Name OriginalName `
-Value ($OriginalName) -InputObject $item;
Add-Member -MemberType NoteProperty -Name OriginalParent `
-Value $OriginalParent -InputObject $item;
Add-Member -MemberType NoteProperty -Name OriginalFullName `
-Value $OriginalFullName -PassThru -InputObject $item;
}
}
$list = Get-Recycled
cls
$list
#Ask for action
write-host ""
write-host "If you do not see any files listed above then there are no deleted files"
write-host ""
Write-host -foreground "magenta" "0. Exit this Script"
Write-host -foreground "magenta" "1. Empty Recycle Bin"
Write-host -foreground "magenta" "2. Restore a ingle file"
Write-host -foreground "magenta" "3. Restore all files with Extension (ex .txt)"
$SelectedIndex4 = Read-Host "What do you want to do?"
$Selection = $SelectedIndex4
if($Selection -eq 0){exit}
if($Selection -eq 1){
Get-Recycled | Remove-Item
pause}
if($Selection -eq 2){
$SelectedIndex1 = Read-Host "Type the file name from what is listed above"
$Selection1 = $SelectedIndex1
Get-Recycled | ?{$_.Name -eq "$Selection1"} | %{Move-Item $_ $_.OriginalFullName}
pause}
if($Selection -eq 3){
$SelectedIndex2 = Read-Host "Type the file Extension to restore (restores all with that Ext)"
$Selection2 = $SelectedIndex2
Get-Recycled | ?{$_.Extension -eq ".$Selection2"} | %{Move-Item $_ $_.OriginalFullName}
pause}
UPDATE: it has been brought to my attention by Vincent Loosveld that if you are using the freeware app A43 as the file manager and shortcuts launcher as I have created it in PSHVM then you can easily GUI access the recycle bin see pic below.
But if you want to do it with powershell here is how:
Here is the code: File named get-recycled.ps1
<#
.Deleting items more than 10 days old
Get-Recycled | ?{$_.Age.TotalDays -gt 10} | Remove-Item
#Get original location of all items deleted in the last hour
Get-Recycled | ?{$_.Age.TotalHours -le 1} | %{$_.OriginalFullName}
.Restore all zip files without overwriting newer files with the same names.
Get-Recycled | ?{$_.Extension -eq ".zip"} | %{Move-Item $_ $_.OriginalFullName}
.Restore all zip files, overwriting newer files if necessary.
Get-Recycled | ?{$_.Extension -eq ".zip"} | %{Move-Item $_ $_.OriginalFullName -Force}
#>
function get-recycled
{
$sa = New-Object -ComObject Shell.Application
$DisplaceDateId = '{9B174B33-40FF-11D2-A27E-00C04FC30871}3'
$DisplaceFromId = '{9B174B33-40FF-11D2-A27E-00C04FC30871}2'
$sa.Namespace(10).Items() | %{
$item = Get-Item -LiteralPath $_.path;
$OriginalName = $_.Name
$whenUtc = $_.ExtendedProperty($DisplaceDateId);
$whenLocal = $whenUtc.ToLocalTime();
$OriginalParent = [IO.DirectoryInfo]($_.ExtendedProperty(
$DisplaceFromId))
$OriginalFullName = Join-Path $OriginalParent $OriginalName
Add-Member -MemberType NoteProperty -Name DeletionTimeUtc `
-Value ($whenUtc) -InputObject $item;
Add-Member -MemberType NoteProperty -Name DeletionTime `
-Value ($whenLocal) -InputObject $item;
Add-Member -MemberType ScriptProperty -Name Age `
-Value {(Get-Date) - $this.DeletionTime} `
-InputObject $item;
Add-Member -MemberType NoteProperty -Name OriginalName `
-Value ($OriginalName) -InputObject $item;
Add-Member -MemberType NoteProperty -Name OriginalParent `
-Value $OriginalParent -InputObject $item;
Add-Member -MemberType NoteProperty -Name OriginalFullName `
-Value $OriginalFullName -PassThru -InputObject $item;
}
}
$list = Get-Recycled
cls
$list
#Ask for action
write-host ""
write-host "If you do not see any files listed above then there are no deleted files"
write-host ""
Write-host -foreground "magenta" "0. Exit this Script"
Write-host -foreground "magenta" "1. Empty Recycle Bin"
Write-host -foreground "magenta" "2. Restore a ingle file"
Write-host -foreground "magenta" "3. Restore all files with Extension (ex .txt)"
$SelectedIndex4 = Read-Host "What do you want to do?"
$Selection = $SelectedIndex4
if($Selection -eq 0){exit}
if($Selection -eq 1){
Get-Recycled | Remove-Item
pause}
if($Selection -eq 2){
$SelectedIndex1 = Read-Host "Type the file name from what is listed above"
$Selection1 = $SelectedIndex1
Get-Recycled | ?{$_.Name -eq "$Selection1"} | %{Move-Item $_ $_.OriginalFullName}
pause}
if($Selection -eq 3){
$SelectedIndex2 = Read-Host "Type the file Extension to restore (restores all with that Ext)"
$Selection2 = $SelectedIndex2
Get-Recycled | ?{$_.Extension -eq ".$Selection2"} | %{Move-Item $_ $_.OriginalFullName}
pause}
NOTE: this will recover the file but not the file extension..not sure why. So you will need to manually add the file extension back onto the file name.
How to Create a Hyper-V VM from an ISO using PowerShell
Nice posting from www.altaro.com from Jeffery Hicks
How to Create a Hyper-V VM from an ISO using PowerShell
Read more: http://www.altaro.com/hyper-v/how-to-create-a-hyper-v-vm-from-an-iso-using-powershell/#ixzz2Xzp88FWT
Not something i have used yet but is nice to know I could.
How to Create a Hyper-V VM from an ISO using PowerShell
Read more: http://www.altaro.com/hyper-v/how-to-create-a-hyper-v-vm-from-an-iso-using-powershell/#ixzz2Xzp88FWT
Not something i have used yet but is nice to know I could.
Checklist for building Free Core Server 2012 and your first VM
Checklist to install free core server 2012, configure the vhost and build your first VM
Build your hardware, enable Virtualization in the BIOS
Download the Free hyper-v server file named "HyperV_Server_2012_FREE.ISO"
Burn your ISO to a DVD
Boot to the DVD
Choose the language and such then click “Next”:
Click “Install Now”
Choose Core = Free, op one
Agree to the Licensing terms, check the box for “I Accept…” and click “Next”:
Choose “Custom: Install Windows only (advanced)":
If you want to partition the drive click on “Drive Options (advanced)" otherwise click “Next”:
You should now be at the screen where the installation takes place. This takes some time.
Once the server has booted up you will need to provide the default Adminstrator account with a proper password. Click “OK” enter a password twice and then proceed:
Then you will be greeted by SConfig (PS if you accidentally close the SConfig box you can type Sconfig in the DOS prompt and it should load, if not then type logoff in the DOS prompt and you will need to log in again but SConfig will be there for you.)
Choose Option 4 to Configure Remote Management:
a. Enter Selection: 1 to Enable Remote Management
b. Enter Selection: 3 to Allow Remote Machines to Ping server.
Click Yes.
Enter Selection: 4 to Return to Main Menu.
Choose Option 7 to configure Remote Desktop Settings.
a. Type E for (E)nable and press Enter.
b. Enter Selection: 2 to allow any version of Remote Desktop to connect.
You will be returned to the Main Menu.
Choose Option 9 to open the Date and Time GUI.
a. Configure the date and time as you would Server 2008 R2
You will be returned to the Main Menu.
Choose Option 8 to configure Network Settings.
a. It will only list the NICs that are connected to a network.
b. Select the Index# for the adapter you want to configure:
c. You will be shown Current Settings.
Select Option 1 to enter IP Address.
a. Enter S for (S)tatic IP address and press Enter.
b. Enter the new IP Address and press Enter.
c. Press Enter again to accept the default Subnet of /24.
d. Enter the new Static Gateway IP and press Enter.
You will be returned to the Network Adapter Settings Menu.
Select Option 2 to enter DNS IP Addresses.
a. Set the Preferred DNS server IP and press Enter.
You will get a confirmation Popup. Press OK to continue.
b. Set the Alternate DNS server IP and press Enter.
You will get a confirmation Popup. Press OK to continue..
You will be returned to the Network Adapter Settings Menu.
c. Select Option 4 to Return to the Main Menu.
In the black CMD/DOS window that is opened by default, type the following in to configure some standard settings: (these are ones I use and recommend) PS no need to install .Net 4.0 as it is already part of the base install.
:Disable TCPChimney
netsh int tcp set global chimney=disabled
:Disable Firewall
netsh advfirewall set allprofiles state off
NOTE: This will allow to RDP and map drives as the firewall is on by default and will prevent you from doing anything remotely until you either turn it off or put in exceptions. I opt to turn it off because I have hardware firewalls.
:Install SNMP-Services (only neeed if you plan on monitoring your VHOST with some monitoring software)
powershell.exe -command "Add-WindowsFeature SNMP-Service"
Choose Option 2 to configure Server Hostname
a. Enter the VHOST hostname and press Enter.
b. You will be prompted to Reboot the server. Click Yes.
ADD THE VHOST TO THE DOMAIN… Not really Needed, but I will show you how.
1. Form the console use the SConfig window.
2. Select Option 1 to Join the VHOST to a Domain.
a. Press D for (D)omain
b. Type the Full Domain and press Enter.
c. Type the Domain Administrator User Name and press Enter.
d. Type the Domain Administrator Password and press Enter.
i. You will be prompted if you want to change the hostname. Click No.
ii. You will be prompted to Restart the machine. Click Yes.
Now you can map a drive to your vhost\\VHOSTname\C$ to get the downloaded and unzipped PSHVM files to your vhost that we are about to install.
Make a directory on the root of called C:\ISO and copy your installation OS -iso file into it
Make a directory on C:\virtualservers (if you setup a datastore dirve for the VM's just change the C: to D:
Copy the folder "PSHVM" that unzipped to C:\pshvm
RDP to the new VHOST
Now Use your DOS prompt and type C:\PSHVM\m.bat to load the Hyper-v Manger menu, choose OK next to the A43 File Manager. A43 if a file manager and has shortcuts in the bottom pane.
Browse to C:\PSHVM and then run the file named vcredist_x86.exe to install the runtime code so you can use the "VMConnect (RDP to VM's) Next you will need to choose the Powershell shortcut. When it opens you will need to type Set-ExecutionPolicy unrestricted and press Enter, answer Yes to allow the change. If you do not do either of these your RDP will not work and you will not be able to use the Hyper-v Manager ...which is why you are following this process.
To get the file manager to open at login you will need to use the regedit edit shortcut and add a string value to
HKLM\software\microsoft\windows\current version\run called file manager that points to c:\PSHVM\a43\a43.exe. If you want a quick status report each time you login you can also add a string value called welcome that points to C:\PSHVM\welcome.bat.
Choose the shortcut called Hyper-v Manager
Once this opens you will notice a powershell window at the upper left. Leave this open you can minimize it if you want but do not close it unless you want hyper-v manager to close. To close hype-v manager you can press the ESC key, use the X or clikc close.
To use it you just click the ok next to the item you want to perform. A Powershell script will open in a new powershell prompt. read and follow the instructions. Some items will open a GUI file explorer pop-up window, just use it like any other program that tou have installed. If unsure read the title of the pop-up window. Each of the scripts will pause then close and return to the menu above.
Now you have built athe vhost you need to configure it, using PS Hyper-V Manager
Set the Virtual Machine and HardDisk paths for the VHost
Create a vSwitch
Create a new VM via questions and answers (I am assuming it is a windows OS)
Start
RDP to a VM, answer OS installation questions. set password, turn off firewall, set the IP address and enable RDP
Manage VM's DVD/ISO.. Insert MS tools and then install them, reboot
Now you can RDP to the server once it comes up and continue setting it upa as needed.
Run and Inventory Report of the VHost and VM's to see if it is setup to your specs. RAM vCPU etc.
You know have a hyper-v server and a VM running on it.
Build your hardware, enable Virtualization in the BIOS
Download the Free hyper-v server file named "HyperV_Server_2012_FREE.ISO"
Burn your ISO to a DVD
Boot to the DVD
Choose the language and such then click “Next”:
Click “Install Now”
Choose Core = Free, op one
Agree to the Licensing terms, check the box for “I Accept…” and click “Next”:
Choose “Custom: Install Windows only (advanced)":
If you want to partition the drive click on “Drive Options (advanced)" otherwise click “Next”:
You should now be at the screen where the installation takes place. This takes some time.
Once the server has booted up you will need to provide the default Adminstrator account with a proper password. Click “OK” enter a password twice and then proceed:
Then you will be greeted by SConfig (PS if you accidentally close the SConfig box you can type Sconfig in the DOS prompt and it should load, if not then type logoff in the DOS prompt and you will need to log in again but SConfig will be there for you.)
Choose Option 4 to Configure Remote Management:
a. Enter Selection: 1 to Enable Remote Management
b. Enter Selection: 3 to Allow Remote Machines to Ping server.
Click Yes.
Enter Selection: 4 to Return to Main Menu.
Choose Option 7 to configure Remote Desktop Settings.
a. Type E for (E)nable and press Enter.
b. Enter Selection: 2 to allow any version of Remote Desktop to connect.
You will be returned to the Main Menu.
Choose Option 9 to open the Date and Time GUI.
a. Configure the date and time as you would Server 2008 R2
You will be returned to the Main Menu.
Choose Option 8 to configure Network Settings.
a. It will only list the NICs that are connected to a network.
b. Select the Index# for the adapter you want to configure:
c. You will be shown Current Settings.
Select Option 1 to enter IP Address.
a. Enter S for (S)tatic IP address and press Enter.
b. Enter the new IP Address and press Enter.
c. Press Enter again to accept the default Subnet of /24.
d. Enter the new Static Gateway IP and press Enter.
You will be returned to the Network Adapter Settings Menu.
Select Option 2 to enter DNS IP Addresses.
a. Set the Preferred DNS server IP and press Enter.
You will get a confirmation Popup. Press OK to continue.
b. Set the Alternate DNS server IP and press Enter.
You will get a confirmation Popup. Press OK to continue..
You will be returned to the Network Adapter Settings Menu.
c. Select Option 4 to Return to the Main Menu.
In the black CMD/DOS window that is opened by default, type the following in to configure some standard settings: (these are ones I use and recommend) PS no need to install .Net 4.0 as it is already part of the base install.
:Disable TCPChimney
netsh int tcp set global chimney=disabled
:Disable Firewall
netsh advfirewall set allprofiles state off
NOTE: This will allow to RDP and map drives as the firewall is on by default and will prevent you from doing anything remotely until you either turn it off or put in exceptions. I opt to turn it off because I have hardware firewalls.
:Install SNMP-Services (only neeed if you plan on monitoring your VHOST with some monitoring software)
powershell.exe -command "Add-WindowsFeature SNMP-Service"
Choose Option 2 to configure Server Hostname
a. Enter the VHOST hostname and press Enter.
b. You will be prompted to Reboot the server. Click Yes.
ADD THE VHOST TO THE DOMAIN… Not really Needed, but I will show you how.
1. Form the console use the SConfig window.
2. Select Option 1 to Join the VHOST to a Domain.
a. Press D for (D)omain
b. Type the Full Domain and press Enter.
c. Type the Domain Administrator User Name and press Enter.
d. Type the Domain Administrator Password and press Enter.
i. You will be prompted if you want to change the hostname. Click No.
ii. You will be prompted to Restart the machine. Click Yes.
Now you can map a drive to your vhost\\VHOSTname\C$ to get the downloaded and unzipped PSHVM files to your vhost that we are about to install.
Make a directory on the root of called C:\ISO and copy your installation OS -iso file into it
Make a directory on C:\virtualservers (if you setup a datastore dirve for the VM's just change the C: to D:
Copy the folder "PSHVM" that unzipped to C:\pshvm
RDP to the new VHOST
Now Use your DOS prompt and type C:\PSHVM\m.bat to load the Hyper-v Manger menu, choose OK next to the A43 File Manager. A43 if a file manager and has shortcuts in the bottom pane.
Browse to C:\PSHVM and then run the file named vcredist_x86.exe to install the runtime code so you can use the "VMConnect (RDP to VM's) Next you will need to choose the Powershell shortcut. When it opens you will need to type Set-ExecutionPolicy unrestricted and press Enter, answer Yes to allow the change. If you do not do either of these your RDP will not work and you will not be able to use the Hyper-v Manager ...which is why you are following this process.
To get the file manager to open at login you will need to use the regedit edit shortcut and add a string value to
HKLM\software\microsoft\windows\current version\run called file manager that points to c:\PSHVM\a43\a43.exe. If you want a quick status report each time you login you can also add a string value called welcome that points to C:\PSHVM\welcome.bat.
Choose the shortcut called Hyper-v Manager
Once this opens you will notice a powershell window at the upper left. Leave this open you can minimize it if you want but do not close it unless you want hyper-v manager to close. To close hype-v manager you can press the ESC key, use the X or clikc close.
To use it you just click the ok next to the item you want to perform. A Powershell script will open in a new powershell prompt. read and follow the instructions. Some items will open a GUI file explorer pop-up window, just use it like any other program that tou have installed. If unsure read the title of the pop-up window. Each of the scripts will pause then close and return to the menu above.
Now you have built athe vhost you need to configure it, using PS Hyper-V Manager
Set the Virtual Machine and HardDisk paths for the VHost
Create a vSwitch
Create a new VM via questions and answers (I am assuming it is a windows OS)
Start
RDP to a VM, answer OS installation questions. set password, turn off firewall, set the IP address and enable RDP
Manage VM's DVD/ISO.. Insert MS tools and then install them, reboot
Now you can RDP to the server once it comes up and continue setting it upa as needed.
Run and Inventory Report of the VHost and VM's to see if it is setup to your specs. RAM vCPU etc.
You know have a hyper-v server and a VM running on it.
Subscribe to:
Posts (Atom)